
Bathroom Remodel: Where to Start and How to Finance It
Start with your floor plan, not your finishes. Before you pick a single tile, evaluate your layout and ask whether there's a smarter way to use the space. Once you know the scope, your surface areas determine your budget... and if you're financing, a HELOC (Home Equity Line of Credit) is the most flexible option for most homeowners, since you only pay interest on what you actually borrow.
That's the quick version. Keep reading for exactly how to do both, from a designer who has guided South Bay homeowners through this process dozens of times.
Broadway
Step 1: Start with your floor plan, not Pinterest
The single biggest mistake homeowners make is starting with finishes. They fall in love with a marble tile on Instagram, then try to build a remodel around it. The problem is that tiles are one of the last decisions you should make... not the first.
The first decision is always your floor plan.
Before anything else, zoom out. Look at the space not just as a bathroom, but as a room within your home. Ask yourself: Is the layout actually working? Does the door swing the wrong way? Could moving a wall, relocating a furnace, or shifting a doorway unlock a few extra square feet that would completely transform how the room feels?
"You're only going to do a project this big once in ten years. You really have to think about it."
Small structural changes... ones that cost relatively little at the renovation stage... can add square footage, improve natural light, or make the layout genuinely functional for how your family lives. These decisions are nearly impossible and extremely expensive to revisit after the fact, so this is where the hard thinking belongs.
And there's a very practical reason the floor plan comes first: your layout determines your surface areas. Your surface areas determine how much tile, flooring, and material you need. And that number directly drives your budget.
Step 2: Understand what finishes actually cost, before you fall in love
Once you have a layout, you can begin to think about finishes... and this is where budget awareness matters most. There is an enormous range in what materials cost.
Tile alone can range from $5 per square foot to $20 per square foot or more. Multiply that across floors, shower walls, a niche, and a backsplash... and the difference between a conservative finish budget and a premium one can be tens of thousands of dollars on the same exact layout.
This is one of the most tangible ways a designer adds value: knowing where to spend and where to save. A skilled designer can balance a higher-investment statement piece... a book-matched stone wall, a freestanding tub... against smarter, lower-cost choices elsewhere, so the finished space looks and feels elevated without blowing the budget.
Designer tip
Bathrooms actually have more finish decisions than kitchens... tile choices alone (floor, shower floor, shower wall, niche, accent) require careful coordination. Getting these decisions locked in before you approach a contractor means you'll get accurate quotes, not rough guesses.
If you're planning to finance the project, knowing your scope and finishes before you apply is especially important. You need real numbers, not estimates, to borrow the right amount.
Step 3: How to finance your bathroom remodel
There are two ways most homeowners fund a bathroom remodel: cash or a Home Equity Line of Credit (HELOC). For many South Bay homeowners... where home values are strong... a HELOC is an exceptionally powerful tool.
How a HELOC works
Think of a HELOC like a credit card backed by your home equity. You're approved for a credit line... say, $300,000... but you only borrow what you need. If your bathroom remodel costs $75,000, you draw $75,000. Your payment is only on the $75,000 you've borrowed, not the full line.
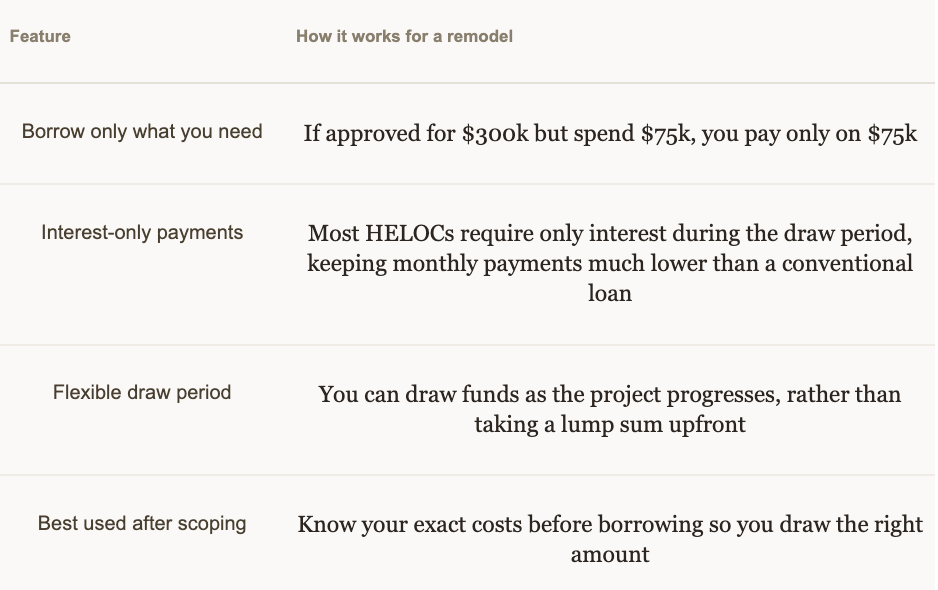
Because most HELOCs are interest-only during the draw period, the monthly payment on $75,000 is a fraction of what you'd pay on a conventional home improvement loan for the same amount. For homeowners in Manhattan Beach, Redondo Beach, Torrance, and Palos Verdes... where equity positions are strong... this can be a very smart way to invest in a home you plan to stay in.
Step 4: The design process... what working with a designer actually looks like
Before I ever look at a floor plan, I ask a series of questions. My goal is to understand the problems I'm solving for and how design can support the way a client actually lives. I often say that my design style is listening.
Once I understand the brief and we've aligned on an aesthetic direction, here's how the process unfolds:
Floor plan first
I always start with the layout. We look at whether there are opportunities to reconfigure the space before we commit to anything else.
Elevations
After the floor plan, I move to elevations... these are scaled drawings of each wall as if you were standing in the room looking directly at it. Elevations show exactly where every tile, fixture, mirror, and light switch will land. This is how we catch problems before construction begins, not after.
Finishes and concept
Then we move to finishes, always starting with the largest surfaces first and building a cohesive design concept around them. Everything in a good bathroom design works together... the tile, the grout, the fixtures, the hardware, the lighting. Nothing is chosen in isolation.
I often meet clients at showrooms so they can experience materials in person... touching a tile, sitting in a freestanding tub, seeing how a fixture actually finishes. Then I put together a complete package for the contractor to execute.
On-site throughout construction
I speak contractor... and that matters. I connect directly with your contractor on how to execute the design details, and I make site visits throughout construction to make sure everything turns out as designed. That last mile is where remodels succeed or fail.
The mistakes that cost homeowners the most
Contractors are excellent builders. They are not always excellent designers... and without clear direction, corners get cut. Here are the detail failures I see most often when homeowners skip the design process:
Using Schluter strips (metal edge trim) instead of mitering tile edges... a shortcut that immediately reads as unfinished in a high-end space
Not verifying whether a tile has a matching finished edge piece, which only becomes a problem when you're already mid-installation
Failing to plan the shower niche so that it aligns with the surrounding tile pattern... a mismatch that's subtle but impossible to unsee
Not maximizing the space... missing the opportunity to reconfigure layout before walls go up
Planning lighting too late, which locks you into placement decisions that don't suit the design and fixtures you actually want
No plan for where tile transitions meet at the shower base... one of the most visible finish details in the entire bathroom
Every one of these is preventable with a design plan in place before construction begins.
Timeline: what to expect
Construction on a bathroom remodel typically takes 1 to 3 months, depending on your contractor and the complexity of the scope. One of the under-appreciated benefits of working with a designer first is that long-lead items... custom cabinetry, specialty tile, plumbing fixtures... are ordered during the design phase and arrive ready when construction starts. That coordination can meaningfully shorten the overall timeline.
Why resale value matters, even if you're not selling
With a real estate background, I approach every remodel with one additional lens: how does this investment perform? The South Bay market is one where smart renovations genuinely move the needle on home value. That means I'm always thinking not just about what you love, but about design decisions that are broadly appealing, timeless, and additive to your home's equity story. Even if you have no plans to sell, a bathroom that adds resale value is one that was built right.
Frequently Asked Questions
Where do I start a bathroom remodel?
Start with your floor plan. Evaluate your layout before looking at any finishes or fixtures. Ask whether there are creative ways to improve flow or add square footage... small structural changes at the renovation stage are far less expensive than changes after the fact. Your layout determines your surface areas, which determines your budget.
How do I finance a bathroom remodel?
The most common options are cash and a Home Equity Line of Credit (HELOC). A HELOC is ideal for most homeowners because you only pay interest on what you borrow, not your full credit line. Most HELOCs are also interest-only during the draw period, keeping monthly payments much lower than a conventional loan.
How much does a bathroom remodel cost in Manhattan Beach or Redondo Beach?
Costs depend heavily on the finishes you choose. Tile alone ranges from $5 to $20+ per square foot, and that variability multiplies across every surface. Working with a designer to scope the project before approaching contractors ensures you get accurate quotes and can make informed borrowing decisions.
How long does a bathroom remodel take?
Construction typically takes 1 to 3 months. Working with a designer first can shorten the overall timeline because long-lead items are ordered in advance and ready when your contractor breaks ground.
Do I need an interior designer for a bathroom remodel?
You don't need one... but the mistakes that happen without one are often expensive and permanent. A designer prevents misaligned tile, poor lighting decisions, and missed layout opportunities. They also balance your budget across finishes so you get a high-end result without overspending in the wrong places.